Title: Skinning tips and tuts
Post by: the_ultimate_evil on March 31, 2007, 03:40:40 PM
Post by: the_ultimate_evil on March 31, 2007, 03:40:40 PM
the old thread seems to have been lost in the reboot, so how about we start this again. anyone got the old tuts saved
any chance of a sticky mods
any chance of a sticky mods
Title: Re: Skinning tips and tuts
Post by: doctorchallenger on March 31, 2007, 05:15:26 PM
Post by: doctorchallenger on March 31, 2007, 05:15:26 PM
http://www.fxforce.com/GRYPHON/tutorial1.html (http://www.fxforce.com/GRYPHON/tutorial1.html)
http://www.imaginationispower.com/images/game/tutorial/ (http://www.imaginationispower.com/images/game/tutorial/)
http://www.geocities.com/skingalltut/texturemap.htm (http://www.geocities.com/skingalltut/texturemap.htm)
http://www.geocities.com/skingalltut/alphatut.htm (http://www.geocities.com/skingalltut/alphatut.htm)
Captain Spud Had a few that I hope he'll repost some day.
NPI Base Skin Thread, with link to Base Skin yahoo group:http://newpowerinc.com/original_freedom/viewtopic.php?t=314 (http://newpowerinc.com/original_freedom/viewtopic.php?t=314)
House Quake's assement of various common skinning programs: http://newpowerinc.com/original_freedom/viewtopic.php?t=1121 (http://newpowerinc.com/original_freedom/viewtopic.php?t=1121)
Title: Re: Skinning tips and tuts
Post by: UnkoMan on April 01, 2007, 11:44:52 AM
Post by: UnkoMan on April 01, 2007, 11:44:52 AM
I had a couple for logos and seams on a few places but... I think they might actually be long gone now. I can look for them on my harddrive if anybody is interested.
Title: Re: Skinning tips and tuts
Post by: Alphanaut on April 01, 2007, 03:18:31 PM
Post by: Alphanaut on April 01, 2007, 03:18:31 PM
Yeah, those tuts were really helpful, especially C6's one on how to do the extras for Vertex's speedster meshes.
Unko, I'm pretty shure your tuts are on the wiki?
Unko, I'm pretty shure your tuts are on the wiki?
Title: Re: Skinning tips and tuts
Post by: UnkoMan on April 01, 2007, 05:29:36 PM
Post by: UnkoMan on April 01, 2007, 05:29:36 PM
Oh, thanks Alpha. The logo one is there. I don't see the seams, but I'll add that soon.
Those are all here by the way:
http://frworld.wikispaces.com/Tutorials
Those are all here by the way:
http://frworld.wikispaces.com/Tutorials
Title: Re: Skinning tips and tuts
Post by: Previsionary on April 01, 2007, 06:25:44 PM
Post by: Previsionary on April 01, 2007, 06:25:44 PM
tutorial on skin tones from UFB (or more accurately, F-A)
http://pro52.msshost.com/~unfluffy/v3/skintones.htm
http://pro52.msshost.com/~unfluffy/v3/skintones.htm
Title: Re: Skinning tips and tuts
Post by: Deaths Jester on April 03, 2007, 08:45:53 AM
Post by: Deaths Jester on April 03, 2007, 08:45:53 AM
I've got two pages of the old tut/tip thread....give me some time and I'll whack 'em down to just the tips/tuts without all the other loss comments.
Title: Re: Skinning tips and tuts
Post by: Deaths Jester on April 05, 2007, 08:05:28 AM
Post by: Deaths Jester on April 05, 2007, 08:05:28 AM
Okay...'eres a few of what used to be posted on the old Skinning Tutorial topic. I've got more, I juest need to find them.
Courtnall6's Chainlink Tutorial
Steps:
1) I make a new layer called \"O-Link\". I use the lasso tool to make a 1/4 of the chain link.
2) I fill the selection with a light grey.
3) Copy and flip the selection horizontally.
4) Copy and flip \"U\" link vertically.
5) I take a darker shade of grey and airbrush shade according to my light source. Directly above in this case. This could also be done using bevel and emboss to save time.
6) Now I airbrush white highlights and smooth them out with the smudge tool.
7) Now I create a new layer called \"I-Link\" and make a slim rectangle of equal height as the O-Link. Then fill with the dark grey shade used earlier.
8) I take the airbrush and spray a light grey line inside the I-Link.
9) I make another smaller white line inside the light grey one.
10) I move the I-Link to where I think it would fit over the O-Link.
11) Now I go back to the O-Link layer, copy and slide the O-Link to where it would fit along the chain.
12) I go back to the I-link layer and do the same.
13) I continue this process until I reach my desired chain length.
14) On the O-Link layer I select and inverse the O-Links.
15) Using the airbrush with a darker shade of grey than before, I make a line along the I-Link. Only where the I-Link covers the O-Link.
16) Finally I merge the two layers and I'm ready to go
(http://i111.photobucket.com/albums/n131/deathsjester/chain_tutorial.jpg)
Courtnall6's Hair I & Goatie Tutorial
Tutorial for skinning hair Part 1:
1) I start by outlining my hair design with the lasso tool. It's slicked back for this tutorial since it is the easiest code .
2) Now I fill the outline with a colour ( in this case brown ).
3) Using the airbrush tool I spray the lower part of the hair with a dark shade of the base colour ( I use black when doing brown hair ).
4) Using the airbrush tool again I spray a line just above the darker shade with a light highlight of the base colour.
5) Another spray with the same highlight colour along the top of the head.
6) Here's the fun part code . I select the smudge tool at 5 pixels and at 70% pressure. Then I start making strokes where I think the hair would flow. I made a few strokes to show you what I mean.
7) I continue to smudge strokes all over the hair again trying to keep with the direction the hair would flow.
8) Now I copy and flip the hair over to the other side and we're done code .
Let's add a goatie to our friend here. I'm sure Auridian will appreciate it
9) Facial hair is done the exact same way as above. I start with an outline of the goat using the lasso tool.
10) Fill outline
11) Spray a dark shade of the base colour along the bottom of the goat and under the moustache.
12) Spray the highlight of the base colour along the top of the moustache and just above the dark shade along the bottom of the goat.
13) Select the smudge tool again but a 2 pixels and again at 70% pressure. Make some more smudge strokes along the flow of the beard.
14) Use smudge strokes all over the beard like the hair above.
15) I had some access pixels on the side of my beard so I just select and delete.
16) Copy and flip the goat over to the other side and he's done code
17) Here's a head shot of the final look in the CT.
(http://i111.photobucket.com/albums/n131/deathsjester/hair_tutorial.jpg)
Courtnall6's Hair II Tutorial
1) I use the lasso tool to outline the style I want.
2) Fill outline.
3) Airbrush darker shade of base colour.
4) Add highlight of base colour above dark shade and on top of head.
5) In the case of Blonde hair I often add a thin white line along the lower highlight.
6) Using the smudge tool at 5 pixels and 70% pressure I make a series of smudge strokes following the flow of the hair.
7) Now I select the back end of the hair.
8) I copy and flip the selected section of hair so that the hair meets up neatly along the back of the head.
9) Using the lasso tool again I fill the gap between the sections of hair.
10) Fill outline.
11) I airbrush the new section similar to what was done above.
12) I then select and inverse the hair piece.
13) Back to the smudge tool I continue to make smudge strokes and blend the 2 pieces together.
14) On an new layer below the hair I add shade to give it a 3 Dimensional look.
15) The hair completed in the CT.
(http://i111.photobucket.com/albums/n131/deathsjester/hair_tutorial_II.jpg)
Title: Re: Skinning tips and tuts
Post by: GhostMachine on April 06, 2007, 08:04:20 PM
Post by: GhostMachine on April 06, 2007, 08:04:20 PM
I can recreated my quick faux-denim tutorial if anyone is interested.
Title: Re: Skinning tips and tuts
Post by: catwhowalksbyhimself on April 06, 2007, 08:05:59 PM
Post by: catwhowalksbyhimself on April 06, 2007, 08:05:59 PM
Just a reminder to everyone to put these things one the wiki. The more, the better.
Title: Re: Skinning tips and tuts
Post by: BatWing on April 06, 2007, 11:25:37 PM
Post by: BatWing on April 06, 2007, 11:25:37 PM
this is great tutorials :D
what about faces?
what about faces?
Title: Re: Skinning tips and tuts
Post by: the_ultimate_evil on April 10, 2007, 03:28:03 AM
Post by: the_ultimate_evil on April 10, 2007, 03:28:03 AM
cheers to ever did the sticky
Title: Re: Skinning tips and tuts
Post by: Night Dragon on April 14, 2007, 12:37:21 AM
Post by: Night Dragon on April 14, 2007, 12:37:21 AM
Quote from: the_ultimate_evil on April 10, 2007, 03:28:03 AM
cheers to ever did the sticky
Maybe now you'll stop trying to skin me for a pair of boots. ;)
Title: Re: Skinning tips and tuts
Post by: the_ultimate_evil on April 22, 2007, 12:08:56 PM
Post by: the_ultimate_evil on April 22, 2007, 12:08:56 PM
boots maybe, belt never
Title: Re: Skinning tips and tuts
Post by: ow_tiobe_sb on April 26, 2007, 08:44:40 AM
Post by: ow_tiobe_sb on April 26, 2007, 08:44:40 AM
I know I have your face tutorial, ips ("blobs of light," etc. :)). I'll check my home computer tonight.
ow_tiobe_sb
Phantom Bunburyist and The Prat in the Hat
ow_tiobe_sb
Phantom Bunburyist and The Prat in the Hat
Title: Re: Skinning tips and tuts
Post by: BatWing on April 26, 2007, 04:19:45 PM
Post by: BatWing on April 26, 2007, 04:19:45 PM
thx :thumbup:
Title: Re: Skinning tips and tuts
Post by: Tomato on May 21, 2007, 01:00:30 PM
Post by: Tomato on May 21, 2007, 01:00:30 PM
http://games.groups.yahoo.com/group/FFBaseSkins1/ -Direct link to the base skin group, as OF is down.
Title: Re: Skinning tips and tuts
Post by: ow_tiobe_sb on September 06, 2007, 05:11:48 PM
Post by: ow_tiobe_sb on September 06, 2007, 05:11:48 PM
Quote from: ips on August 08, 2007, 02:15:41 PMHrm...only a few months late on this task. :oops:Quote from: ow_tiobe_sb on April 26, 2007, 08:44:40 AM
I know I have your face tutorial, ips ("blobs of light," etc. :)). I'll check my home computer tonight.
ow_tiobe_sb
Phantom Bunburyist and The Prat in the Hat
tks ots =) - can't find it... just the pics
ow_tiobe_sb
Phantom Bunburyist and Tutorial Archivist
---------------------------------------------------------------------
ips's face tutorial
this is a cross post i put in the skinning tips thread...
good luck.
Quote from: House Quake
Faces and Expressions:
This is a general tip based on observations and definately not a obsolute rule.
It is very hard to give a short tutorial on how to make faces in an imaging program. This aspect just about as much as creating musculature and such (ie base skins) truly is an aspect determined on the artist's own actual level of training and skill. Some of us have actually gone through some level of formal instruction or have been self taught in honing our own talents.
The suggestion i have for those whom have not had prior experience with rendering faces is seek proffesional help :o
in response to this... not that i'm a professional help type but hey...
a face tutorial: from the base up.
Introduction: to be a clone or stand on ur own, that is the question.
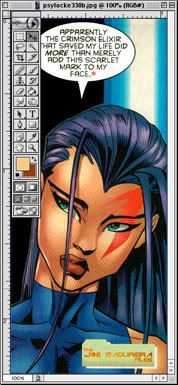
do you want your skin to look like everyone else's? maybe, but probably not. and this is for those probably not people. i approach my skinning very much from that perspective. anyone that is familiar with my work most likely will tell u i pay much attention to detail and i tend to be a perfectionist (or try to be) but once that all comes together i can usually come up with a passable final result. faces though are my specialty... i would like to say that is where i shine, so that's what i'll be covering here.
you will need adobe photoshop or something comparable. this tutorial should be non-specific enough to not matter though. but whatever u use... u must be able to use LAYERS. sorry no way around it. you will also need to have REFERENCE work to look back and forth to ... making it up on the fly is the worst way to go and the biggest time waster. don't sit down infront of the computer unless u know exactly what your game plan is. otherwise u'll waste ur time starting blankly at the screen not knowing what to do next. if u reach a point where u get lost and lose ur plan... that's when u know it's time to take a break (like i mention later in this document). fig. 0 is my inspiration piece and reference material.
in terms of skinning there are many ways to define your work as your own and show your uniqueness, but it so happens that customizing your character's faces is the absolute easiest way to seperate your skins from other's and begin to develop a distinctive style all of your own. moreso than any other way i can think of. faces are really artistic when it comes down to it so i can only impart my process... finding your own way will be up to each of you that attempt to do this. ;)
no more attack of the clones for you? -- no problem. read on.
fig 0 - the inspiration piece.
step1: starting with a clean slate!
ok we use a base skin to save time. no problem there. but base skins come fit with standard faces created in the base skin artist's unique style nomatter who did it. after that base has been used say 50billion times by that original artist (let alone all the followers and users of that base) it will tend to get tired fast. generic looking to say the least. it has happened to all the most popular base skins and will happen to any in the future. so since we're tackling faces here as a starting point for doing you own work we need to clean the slate of the base skin's face. we won't remove it entirely but all of the essential areas need to go.
fig. 1 depicts this.
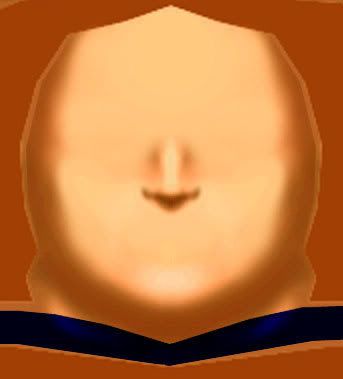
i have removed almost all of the pre-existing base face for the nose (optional removal) and edge shadows of the face (chin and sides etc.). removing the nose is optional depending on how brave you are. i tend to edit noses here and there only to a minor degree generally speaking but it depends on the nature of the character. really unsually shaped faces with unique noses of characters will require new noses but most more aestheically pleasing character usually require little nose work. examples of characters that DID need nose work which i did are apocalypse and toad. the time spent there was essential and definately contributed to the overall look and feel of the characters. edge shadows like the chin were left as they are not essential and very basic at the level i've let them remain. they will be added onto anyhow so discard or keep them where u see fit.
once u are done cleaning the slate you can move onto step 2. ;)
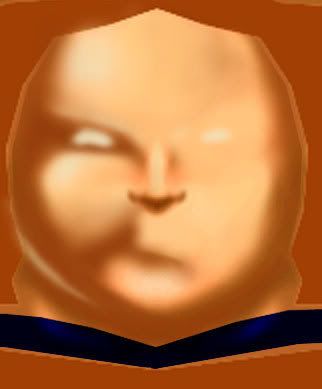
step2: blobs of colour people, blobs of colour.
in a thread once i tried to explain my process... it's easier to show you in this here tutorial. once i have a clean slate i turn on my wireframe to judge where my areas will approximately fall. then i select my lasso tool (i don't use any fancy tablets or anything just plain mouse and keyboard). using the lasso tool i begin to select a region which will represent the shadows of my character's face.
the lasso tool can be difficult for some people but patience will pay off, stick with it. rather than select entire regions and get frustrated, select smaller regions. also try drawing your lines a bit at a time adding more to the line as you go. you can do this by alt+clicking and dragging ur mouse. doing this lays down an anchor if u will of ur selection line allowing u to commit to that section of the line and doing the next part. it can take a while this way but when u get fast it's like drawing with a pencil a bit at a time.
when defining my selection i am using my reference image as a guide. i am trying to reproduce the shape of the dark shadows on her face. i must keep in mind her head is tilted on an angle and i'm skinning as though the face was not tilstend and there was no angle. once u've defined ur area with the lasso tool and it is ur active selection i recommend creating a new layer overtop of ur face to work with. this way u never ruin the underlying face and can go back to the beginning if u screw it up enough and hate the progress u have made so far. i know i've been there b4. anyhow, fill your selection area on the new empty layer. it should look much like fig2. a giant selected region... of a blob of colour.
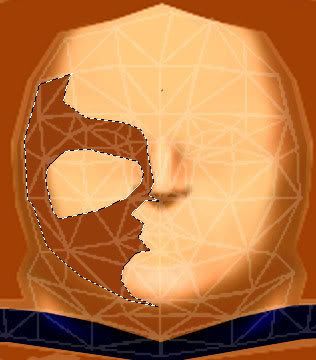
notice the colour i filled with. i chose to use my eyedropper tool to select the colour of the darkest shadow found in those left over chin edges and face shadows. this is done to ensure the colour will blend in pretty easily into the rest of the shadows seeing as they will overlap.
step3: blur baby blur.
fig3 is pretty self explanitory.
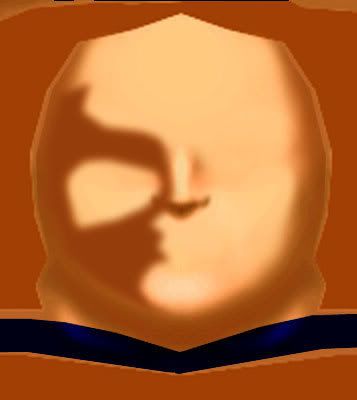
so u made ur area... now u blur it. guassian blur is my most frequently used photoshop filter. infact i ONLY use that filter and the sharpen filter occasionally when skinning. i recommend doing the blur somewhere between 3-4. find what works for you though.
once the area is blurred you can really already start to see the shadows take shape and it starts to really make sense. now you can see how well it will blend colour wise and where it is too soft edged or too hard edged. where u will need to soften or not.
step4: working with what you've got.
so you've come this far.. u've got a fuzzy blob of colour and u don't know what to do with it... it's not done is it? hell no.
now the artistic element comes in. you need to go back to your reference picture and start to recreate what you see. using the brush tool you can paint the shadows more or remove them if there is too much of it in a region. switching ur brush mode from normal to clear allows u to clear areas softly with soft pain brush edges instead selecting a hard region and deleting it leaving ugly edges. alternate from normal to clear, painting to removing, respectively to define ur shadows further.
fig4 shows my heavy process of this technique.
you will also notice very light regions. i use the same process here to do highlights on another layer above with my skintone highlight colour. incidentally i use this same process for all of my face parts and skin parts in general. creating a blob which becomes an eye or a costume or whatever.
step5: bringing it all together.
i've skinned in the community for about 3 years now so i've had the opportunity to create blobs which became eyes and lips and such. so i saved these elements which i can use on later skins like in this case. you may not have this luxury... if u do break out your eyes and lips and such if you don't... make some or download "face bits" where you can.
once i've become satisfied (mostly) with my shadows and highlights and how the face is coming together i put in my own face bits. now i get to see how the face will really come together and i begin the process of final edits.
once face bits are in place u can usually see areas u wanna clean up. like in fig 5.
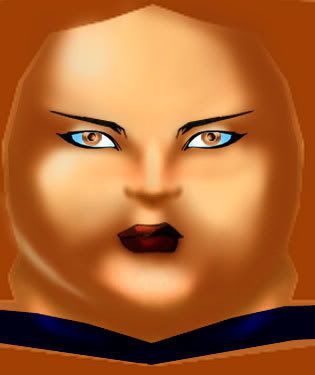
go crazy but keep backups incase u don't like ur changes. this last tuning part is the worst part because u tend to 2nd guess yourself and get lost. just stay focused and take breaks. sometimes step back from the work for a couple days and then coming back will allow u to see what u didn't see b4 and u can move into the finish line of the piece.
sometimes it takes more than 2 days though Wink. find what works for you. i hope this is of some use to people and it's not all terribly obvious advice.
goodluck.
Title: Re: Skinning tips and tuts
Post by: BatWing on September 07, 2007, 08:43:23 PM
Post by: BatWing on September 07, 2007, 08:43:23 PM
yhx dude now i can make faces!!
kudos!
kudos!
Title: Re: Skinning tips and tuts
Post by: Lunarman on October 14, 2007, 10:20:49 PM
Post by: Lunarman on October 14, 2007, 10:20:49 PM
Just so people see it! Sadly, it's a rather unflashy link.
The Five Steps of Skinning, skinning tutorial!
DOWNLOAD (http://thedod.freedomforceforever.com/downloads/The%20Five%20Steps%20of%20skinning.doc)
The Five Steps of Skinning, skinning tutorial!
DOWNLOAD (http://thedod.freedomforceforever.com/downloads/The%20Five%20Steps%20of%20skinning.doc)
Title: Re: Skinning tips and tuts
Post by: Outcast on November 30, 2007, 02:02:59 AM
Post by: Outcast on November 30, 2007, 02:02:59 AM
Here's a skinning tip link from irrational games.
http://www.irrationalgames.com/modforce/ArtProc/
click on tutorials on the left menu, then choose 6. skinning tips. :)
Though, i think it lacks some details on how to go about each step.
Of course, it assumes you are already familiar with photoshop. :unsure:
http://www.irrationalgames.com/modforce/ArtProc/
click on tutorials on the left menu, then choose 6. skinning tips. :)
Though, i think it lacks some details on how to go about each step.
Of course, it assumes you are already familiar with photoshop. :unsure:
Title: Re: Skinning tips and tuts
Post by: Previsionary on November 30, 2007, 10:10:24 AM
Post by: Previsionary on November 30, 2007, 10:10:24 AM
Quote from: Outcast on November 30, 2007, 02:02:59 AM
Here's a skinning tip link from irrational games.
http://www.irrationalgames.com/modforce/ArtProc/
click on tutorials on the left menu, then choose 6. skinning tips. :)
Though, i think it lacks some details on how to go about each step.
Of course, it assumes you are already familiar with photoshop. :unsure:
I really don't think this link is necessary at all. It's only been on your game cd, online, and probably on your hard drive (if you were to actually...check) for years. But what do I know?
Title: Re: Skinning tips and tuts
Post by: Outcast on November 30, 2007, 11:49:28 PM
Post by: Outcast on November 30, 2007, 11:49:28 PM
Quote from: Previsionary on November 30, 2007, 10:10:24 AM
I really don't think this link is necessary at all. It's only been on your game cd, online, and probably on your hard drive (if you were to actually...check) for years. But what do I know?
You seem to know a lot IMHO. ^_^ Sorry for the link. :doh: :P
Title: Re: Skinning tips and tuts
Post by: GGiant on January 26, 2008, 09:19:28 PM
Post by: GGiant on January 26, 2008, 09:19:28 PM
Can anyone give tips on how to make "pants"?
Title: Re: Skinning tips and tuts
Post by: Dr. Kraken on February 07, 2008, 04:18:50 PM
Post by: Dr. Kraken on February 07, 2008, 04:18:50 PM
Anyone remember that free program you can use for skinning? Alot of my programs disappeared and I think I may wanna try a skin or two.
Title: Re: Skinning tips and tuts
Post by: Carravaggio on February 07, 2008, 04:39:55 PM
Post by: Carravaggio on February 07, 2008, 04:39:55 PM
Gimp, maybe?
I think there is a free legal version of Photoshop Pro available for download. Maybe this question would get better responses in the freeware thread in general discussion?
I think there is a free legal version of Photoshop Pro available for download. Maybe this question would get better responses in the freeware thread in general discussion?
Title: Re: Skinning tips and tuts
Post by: Outcast on February 19, 2008, 02:44:47 AM
Post by: Outcast on February 19, 2008, 02:44:47 AM
Ok. This is an old link i know but hey it offers some skinning tips.
Its from Atomic Robot. http://www.geocities.com/robotatomic/skin.html
It's always interesting to see how other people skin. ^_^
What i would like to know is how to create wiremap guides for particular meshes that don't have one.
Also, i've always been curious with the idea of using real people's pictures (faces in particular) on skinning.
I've seen some pretty cool skins that used faces from real people. Was Atomic Robot the only one who used this in the past?
Title: Re: Skinning tips and tuts
Post by: H0UR_MAN on May 03, 2008, 07:41:03 PM
Post by: H0UR_MAN on May 03, 2008, 07:41:03 PM
Would there be a beginning art program that is free that I could download that I can learn to make my own skins on? Thank you.
Title: Re: Skinning tips and tuts
Post by: AfghanAnt on May 03, 2008, 08:01:18 PM
Post by: AfghanAnt on May 03, 2008, 08:01:18 PM
Quote from: H0UR_MAN on May 03, 2008, 07:41:03 PM
Would there be a beginning art program that is free that I could download that I can learn to make my own skins on? Thank you.
I guess Gimp. I haven't ever used it but it support alphas and enables layers (I think).
Title: Re: Skinning tips and tuts
Post by: laughing paradox on July 31, 2008, 08:21:32 AM
Post by: laughing paradox on July 31, 2008, 08:21:32 AM
Are there any tutorials out there that tell you how to make a base skin have a metallic finish?
I have read Gryphon's tutorial about using Curves, but I am absolutely atrocious with that feature so I would be curious if anyone had an alternate method.
I have read Gryphon's tutorial about using Curves, but I am absolutely atrocious with that feature so I would be curious if anyone had an alternate method.
Title: Re: Skinning tips and tuts
Post by: doctorchallenger on September 07, 2008, 11:50:30 AM
Post by: doctorchallenger on September 07, 2008, 11:50:30 AM
http://freedomreborn.net/archive/index.php?topic=44247.0 (http://freedomreborn.net/archive/index.php?topic=44247.0) by murs47
Title: Re: Skinning tips and tuts
Post by: life_matrix on October 19, 2008, 11:40:51 PM
Post by: life_matrix on October 19, 2008, 11:40:51 PM
Quote from: doctorchallenger on March 31, 2007, 05:15:26 PM
http://www.fxforce.com/GRYPHON/tutorial1.html (http://www.fxforce.com/GRYPHON/tutorial1.html)
http://www.imaginationispower.com/images/game/tutorial/ (http://www.imaginationispower.com/images/game/tutorial/)
http://www.geocities.com/skingalltut/texturemap.htm (http://www.geocities.com/skingalltut/texturemap.htm)
http://www.geocities.com/skingalltut/alphatut.htm (http://www.geocities.com/skingalltut/alphatut.htm)
Captain Spud Had a few that I hope he'll repost some day.
NPI Base Skin Thread, with link to Base Skin yahoo group:http://newpowerinc.com/original_freedom/viewtopic.php?t=314 (http://newpowerinc.com/original_freedom/viewtopic.php?t=314)
House Quake's assement of various common skinning programs: http://newpowerinc.com/original_freedom/viewtopic.php?t=1121 (http://newpowerinc.com/original_freedom/viewtopic.php?t=1121)
There's a lot of useful and interesting tutorials presented or linked to in this thread. However, among others, the following links are broken:
http://pro52.msshost.com/~unfluffy/v3/skintones.htm
http://www.imaginationispower.com/images/game/tutorial/ (http://www.imaginationispower.com/images/game/tutorial/)
NPI Base Skin Thread, with link to Base Skin yahoo group:http://newpowerinc.com/original_freedom/viewtopic.php?t=314 (http://newpowerinc.com/original_freedom/viewtopic.php?t=314)
House Quake's assement of various common skinning programs: http://newpowerinc.com/original_freedom/viewtopic.php?t=1121 (http://newpowerinc.com/original_freedom/viewtopic.php?t=1121)
I could find an archived copy of the first two (Syn's Skinning Tutorials (http://web.archive.org/web/20070620174755/http://pro52.msshost.com/~unfluffy/v3/skintones.htm) and Andrew G Davis' skin tutorial (http://web.archive.org/web/20070410161422/www.imaginationispower.com/images/game/tutorial/index.html)) on the Archive.org Wayback Machine. However, all the images are gone and without them the tute is not very easy to follow. The other two can not be found on Archive.org at all (being forum threads).
Any chance that someone can repost or offer an alternative link?
Title: Re: Skinning tips and tuts
Post by: UnfluffyBunny on October 20, 2008, 10:23:49 AM
Post by: UnfluffyBunny on October 20, 2008, 10:23:49 AM
pretty sure I reposted my skintones tute on the wiki, but I dont have a link right now
Title: Re: Skinning tips and tuts
Post by: Tomato on October 20, 2008, 12:06:56 PM
Post by: Tomato on October 20, 2008, 12:06:56 PM
Quote from: Tomato on May 21, 2007, 01:00:30 PM
http://games.groups.yahoo.com/group/FFBaseSkins1/ -Direct link to the base skin group, as OF is down.
OF-Original Freedom, the NPI forum.
Title: Re: Skinning tips and tuts
Post by: ow_tiobe_sb on November 09, 2008, 07:55:11 AM
Post by: ow_tiobe_sb on November 09, 2008, 07:55:11 AM
Since finding software suitable for skinning has proven to be a perennial question with newcomers (and since House Quake's excellent review thread went down with the OF ship), I have reposted this information here to save the moderators the trouble of hitting the "Sticky" button.
The High End Software
Adobe Photoshop: (http://www.adobe.com/products/photoshop/photoshop/) The graphic industry's tool of choice. This programme does it all: layers, customisable brushes, filters/plug-ins, channels/Alpha transparency, etc. Photoshop CS4 currently costs $699, but you may be able to purchase it for less on eBay or at an academic price (if you are a student).
Corel Paint Shop Pro: (http://www.corel.com/servlet/Satellite/us/en/Product/1184951547051#versionTabview=tab0&tabview=tab0) The relatively inexpensive competitor to Adobe Photoshop, Paint Shop Pro has most (if not all) of the tools and capabilities of PS (especially for the limited purposes of skinning for FF) at a fraction of the price ($79.99, but actually $59.99 after $20.00 instant rebate).
Free Software
GIMP (The GNU Image Manipulation Programme): (http://www.gimp.org/) Absolutely free, GIMP works with layers/channels, has its own array of filters, and can save to TGA and DDS formats--everything you might need for skinning. I've downloaded this programme myself, and I can assert that it is easy to learn and easy to use.
Paint.NET: (http://www.getpaint.net/index.html) Again, free with unlimited free, automatic updates, this programme uses layers/channels, plug-ins, and can save to TGA and DDS formats. I have not played around with this application much, but it does seem to be less intuitive to use than GIMP. 'Tis worth taking it for a spin to see what you prefer.
There are other mid-level programmes out there, but these are the major applications (with all of the graphic tools you need to start skinning besides Character Tool from Irrational Games) that have demonstrated both popularity and staying power.
ow_tiobe_sb
Phantom Bunburyist and Fop o' th' Morning
Title: Re: Skinning tips and tuts
Post by: life_matrix on December 10, 2008, 06:22:56 PM
Post by: life_matrix on December 10, 2008, 06:22:56 PM
Thanks for the comparison, ow_tiobe_sb. It should make deciding on what to use much easier.
I've been using Corel Photo-Paint 8 for years now. But I've never tried GIMP. And I only have partial familiarity with either Adobe Photoshop or Paint.NET. I did play around with Adobe Photoshop years ago at college, but not since.
I only recently installed Paint.NET and while I found it to have potential, the interface is, indeed, a bit intimidating. That, and I recently discovered that Paint.NET refuses to load some types of .DDS files. I know these files are not corrupted because I could open them with other programs. And the files were small, so it wasn't anything simple like running out of memory.
What really put me off of Paint.NET, however, is - ironically - their community. I posted a brief and polite explaination of my problem with certain .DDS files. But the thread was ignored. Eventually, I bumped my own thread... and it still got ignored. I waited a while and finally bumped it a second time... and then the admin chided me for bumping and LOCKED the topic. :rolleyes:
Anyway, some paint and image editing programs are far superior to others at certain tasks. In particular, I've noticed that MOST JPEG images on the Net were compressed using a vastly inferior algorithm. If you want to get the most compression out of a JPEG without any risk of artifacts, consider using a professional image editing program like Paint Shop Pro. With Corel Photo-Paint 8 I can get as much as 10 times more compression out of a .JPG before it starts to degrade - that's 10 X vs. what your run-of-the-mill digital camera or cheap paint program can do! (I vaguely recall reading an article on how Corel's patented JPEG algorithm is the most powerful.) Until recently I was stuck with dial-up and I know first hand how some users really appreciate small image size!
I wrote about this on a recent Morrowind mods thread on the Bethesda forums:
[REL] The Jacket by Illuminiel (http://www.bethsoft.com/bgsforums/index.php?showtopic=918793)
What Alphax responded with was rather shocking to me:
What...?! :blink: You mean, even though Adobe Photoshop is often touted as being the best at image editing, it still has such a serious flaw? Even though purchasing the basic version can cost $700? :wacko:
That's just shameful. :thumbdown: Almost makes me glad I'm still stuck with an outdated version of Photo-Paint. Perhaps then, when I do upgrade, this is still one more reason I'd be better off switching to Paint Shop Pro? Or should I try GIMP, instead? :unsure:
BTW: GIMP might be easy to learn. But does it have nearly as much functionality as, say, PaintShop Pro or Paint.NET? And is there a large selection of plugins and/or an active plugin development community?
I've been using Corel Photo-Paint 8 for years now. But I've never tried GIMP. And I only have partial familiarity with either Adobe Photoshop or Paint.NET. I did play around with Adobe Photoshop years ago at college, but not since.
I only recently installed Paint.NET and while I found it to have potential, the interface is, indeed, a bit intimidating. That, and I recently discovered that Paint.NET refuses to load some types of .DDS files. I know these files are not corrupted because I could open them with other programs. And the files were small, so it wasn't anything simple like running out of memory.
What really put me off of Paint.NET, however, is - ironically - their community. I posted a brief and polite explaination of my problem with certain .DDS files. But the thread was ignored. Eventually, I bumped my own thread... and it still got ignored. I waited a while and finally bumped it a second time... and then the admin chided me for bumping and LOCKED the topic. :rolleyes:
Anyway, some paint and image editing programs are far superior to others at certain tasks. In particular, I've noticed that MOST JPEG images on the Net were compressed using a vastly inferior algorithm. If you want to get the most compression out of a JPEG without any risk of artifacts, consider using a professional image editing program like Paint Shop Pro. With Corel Photo-Paint 8 I can get as much as 10 times more compression out of a .JPG before it starts to degrade - that's 10 X vs. what your run-of-the-mill digital camera or cheap paint program can do! (I vaguely recall reading an article on how Corel's patented JPEG algorithm is the most powerful.) Until recently I was stuck with dial-up and I know first hand how some users really appreciate small image size!
I wrote about this on a recent Morrowind mods thread on the Bethesda forums:
[REL] The Jacket by Illuminiel (http://www.bethsoft.com/bgsforums/index.php?showtopic=918793)
What Alphax responded with was rather shocking to me:
Quote from: AlphaxPhotoshop is the worst offender since it's implementation of JPEG is completely broken (it's hard to emphasise that enough) - the quality settings 6 and 7 are reversed and they do strange things with the progression of the quantisation tables across quality levels. See here for more details.
What...?! :blink: You mean, even though Adobe Photoshop is often touted as being the best at image editing, it still has such a serious flaw? Even though purchasing the basic version can cost $700? :wacko:
That's just shameful. :thumbdown: Almost makes me glad I'm still stuck with an outdated version of Photo-Paint. Perhaps then, when I do upgrade, this is still one more reason I'd be better off switching to Paint Shop Pro? Or should I try GIMP, instead? :unsure:
BTW: GIMP might be easy to learn. But does it have nearly as much functionality as, say, PaintShop Pro or Paint.NET? And is there a large selection of plugins and/or an active plugin development community?
Title: Re: Skinning tips and tuts
Post by: House Quake on December 10, 2008, 08:51:50 PM
Post by: House Quake on December 10, 2008, 08:51:50 PM
Quote from: ips on December 10, 2008, 07:01:14 PM
photoshop is the standard for design period. it can be used to create website designs or photographic retouching for high end fashion mags. it's functionality is massive. even if that guy is right and settings 6-7 have problems on JPG optimization it's not much of an issue. most of the world doesn't use photoshop to make low quality images. it's like dumping your girlfriend for having a single grey hair think of it that way.
Well you know I'm a supporter of Paint Shop Pro. Am using PSP X2 now. It lacks the over all 'depth' that photoshop has... but it's still feature rich and compatible with photoshop plug ins and such. At a fraction of the cost... I've always felt it was the better product for the 'non' professional. But even If you're an industry person... Photoshop is the standard... but not the absolute.
Their are free programs out there which can do competent graphics Art Weaver, Paint.Net and of course the GIMP
Title: Re: Skinning tips and tuts
Post by: life_matrix on December 11, 2008, 02:13:25 AM
Post by: life_matrix on December 11, 2008, 02:13:25 AM
The part I thought was shameful was not about having such a bug. It's a given that all software of any complexity is capable of having bugs and/or unintended consequences. Instead, what I thought was bad was how it should have been caught right away and users warned to upgrade with a patch.
I don't think you would say that if you were still stuck on dial-up, like many people still are. I think it's an issue because I doubt that many who use Photoshop know about it and because of the potentially significant impact it might have on bandwidth and wasted storage space. By itself, one bloated image doesn't make much difference. But with many, many thousands of users, the impact starts to be felt... especially many images later.
Granted, this is only for settings 6 and 7, which are low quality. But I think that's exactly the type of setting that should be used for images shared on the Net. And admittedly, the huge, bloated size of most JPEG files can not be blamed entirely on a software glitch. I'm sure a lot of people are simply inconsiderate of others in terms of bandwidth and file size and choose to save with little or no compression (if they're even aware of such technical jargon or choices). And I'm sure a lot of others simply upload their JPEGs straight from their digital camera or whatever without attempting to shrink the resolution or add compression.
It's that kind of mentality that reminds me of people who used to send me huge email attachments filled with enormous images, flash animations, and/or movies - even though I've told them before that I only had dial-up. :rolleyes:
In any case, I think the primary use for any image editing program is to share the result with others. And in this day and age the primary means of sharing images is through the Net. Sure, you can share images in a lossless format such as .png or .tga. But, IMHO, you'd better have a good reason for doing so.
For things like desktop publishing, components of a software program, or skins or textures for a 3D mesh, this is perfectly understandable. Even for something like a desktop wallpaper, a lossless format (aside from .BMP) is acceptable. (Though, personally, I always save wallpaper in JPEG.) But for things like Internet ads, game or software screenshots, or even sharing photos of the family - for images of any significant size - these should always be saved in a high compression format. IMHO, there's no excuse not to. (And why anyone is still using .BMP is beyond my understanding!)
I use a high rate of JPEG compression all the time and, visually, the difference is barely noticable. However, I do notice the huge savings in download speed and storage space. It's so noticable, in fact, that sometimes I spend a half hour or so just loading downloaded images in Photo-Paint and resaving them in a respectable compression and smaller resolution - saving myself many megabytes of space.
While I'm on the subject, I've also noticed that a lot of game screenshots seem far too dark to notice details. (And my friend tells me my monitor is set so bright it's almost blinding.) So if I go to the trouble of resaving screenshots, I often apply some Gamma Correction, too.
Quote from: ips on December 10, 2008, 07:01:14 PM
even if that guy is right and settings 6-7 have problems on JPG optimization it's not much of an issue. most of the world doesn't use photoshop to make low quality images. it's like dumping your girlfriend for having a single grey hair think of it that way.
I don't think you would say that if you were still stuck on dial-up, like many people still are. I think it's an issue because I doubt that many who use Photoshop know about it and because of the potentially significant impact it might have on bandwidth and wasted storage space. By itself, one bloated image doesn't make much difference. But with many, many thousands of users, the impact starts to be felt... especially many images later.
Granted, this is only for settings 6 and 7, which are low quality. But I think that's exactly the type of setting that should be used for images shared on the Net. And admittedly, the huge, bloated size of most JPEG files can not be blamed entirely on a software glitch. I'm sure a lot of people are simply inconsiderate of others in terms of bandwidth and file size and choose to save with little or no compression (if they're even aware of such technical jargon or choices). And I'm sure a lot of others simply upload their JPEGs straight from their digital camera or whatever without attempting to shrink the resolution or add compression.
It's that kind of mentality that reminds me of people who used to send me huge email attachments filled with enormous images, flash animations, and/or movies - even though I've told them before that I only had dial-up. :rolleyes:
In any case, I think the primary use for any image editing program is to share the result with others. And in this day and age the primary means of sharing images is through the Net. Sure, you can share images in a lossless format such as .png or .tga. But, IMHO, you'd better have a good reason for doing so.
For things like desktop publishing, components of a software program, or skins or textures for a 3D mesh, this is perfectly understandable. Even for something like a desktop wallpaper, a lossless format (aside from .BMP) is acceptable. (Though, personally, I always save wallpaper in JPEG.) But for things like Internet ads, game or software screenshots, or even sharing photos of the family - for images of any significant size - these should always be saved in a high compression format. IMHO, there's no excuse not to. (And why anyone is still using .BMP is beyond my understanding!)
I use a high rate of JPEG compression all the time and, visually, the difference is barely noticable. However, I do notice the huge savings in download speed and storage space. It's so noticable, in fact, that sometimes I spend a half hour or so just loading downloaded images in Photo-Paint and resaving them in a respectable compression and smaller resolution - saving myself many megabytes of space.
While I'm on the subject, I've also noticed that a lot of game screenshots seem far too dark to notice details. (And my friend tells me my monitor is set so bright it's almost blinding.) So if I go to the trouble of resaving screenshots, I often apply some Gamma Correction, too.